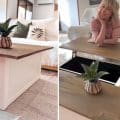
We have a small apartment but wanted to host board game nights without a huge table taking up space. This board game table IKEA hack took around 2 hours total, and cost around $180. The expanding board game table gives us flexibility in using our limited amount of space in our apartment.
How does an expanding IKEA board game table work?
This is how the completed expanding board game table looks and works. The main structure are two IKEA LACK TV stands.
Pull the two tables apart to extend the rails.
Set the table leaves in the gap to complete the IKEA board game table.


How to build an extendable board game table
IKEA items used:
- LACK TV Unit – Qty 3-6 depending on how much expansion wanted
Other materials and tools:
- Easy Mount Expanding Slide Table Rails
- #10 wood screws – 3/4″ Length – Hex Head
- 1/4″ Wooden Dowels
- Ruler or Measuring Tape
- Pencil
- Drill
- 1/16″ Drill Bit
- 1/4″ Drill Bit
- 5/16″ Drill Bit
- Flat Head Screwdriver Bit
1. Pick a large flat surface to work on — a kitchen floor was used for this project.
2. Assemble two IKEA Lack TV Units, without the bottom shelf installed.
3. Lay out all needed materials.

4. Using a ruler and pencil, create drill mark locations on the faces of the Lack TV Unit that will touch each other. Drill locations are 1″ from the edge of the table, and in the midpoint of that line.


5. You can also create a drill mark location in the center of the table, as seen below, but it can be skipped if needed.

6. Drill at the marked locations, using a 1/16″ drill bit.

Start with a small drill bit, and work your way up to the larger ones – this will help prevent wood and paint chipping, acting like a guide for the larger drill bits.
7. Gradually increase drill bit size to 1/4″ – wipe away wood dust – a vacuum works best.


8. Install 1/4″ wood dowels on one side – wood glue not needed, but can be used.

9. Enlarge the holes on the table not using the wood dowels to 5/16″ — this helps compensate for any slop in the original marks and drilling of the holes.

10. Place Easy Mount Slide Rails onto mated table pieces, and mark drill locations.


11. Create pilot holes using 1/16″ Drill Bit.

12. Install #10 wood screws using flat head screwdriver bit or hex bit.


13. Repeat steps 10-12 for opposite mounting sides.

14. Flip the table over, and test out functionality.

Making the table leaves
15. Place this finished portion of the table out of the way. Next is to make the table leaves.
16. Gather the other LACK TV Unit Shelf pieces, which will act as table leaves, and begin marking drill locations for dowels and 5/16″ mating holes.
17. Use the same drill locations used in step 4. Use a ruler and pencil.

18. Use the same method of drill enlargement in step 6-7.

19. Repeat for the other side of the table leaf.
20. Pick the one side that will not have wooden dowels installed, and drill out 5/16″ holes.
21. Install wood dowels on one side of the table leaf with the remaining 1/4″ holes. One side of the leaf will have 1/4″ wood dowels, and the other side will have 5/16″ holes.

22. Repeat steps 16-21 for as many table leaves as you want.
23. Expand your table, and test install of your table leaves.
24. Enjoy your new expanding board game table!
Other considerations:
Be careful when marking drill hole locations. This was the hardest aspect of the project. Looking back, we would likely use wood glue when installing dowels. Additionally, we would also likely use a template for marking hole locations, rather than marking using a ruler multiple times.
When working, be careful not to drag the IKEA product on the floor, as it can scratch the paint. We used cardboard from the IKEA box as a working surface.
~ by Adam

