A tutorial for installing IKEA drawers in face frame kitchen cabinets.
Goal: Increase useful storage space in typical kitchen face frame base cabinets by installing drawer pull-outs.
Summary:
Typical kitchen face frame base cabinets have limited effective storage space because, while 24” deep, only the first half or so of that depth is easily and readily available. A much preferred situation would allow access to, and use of, the full depth of the cabinet.
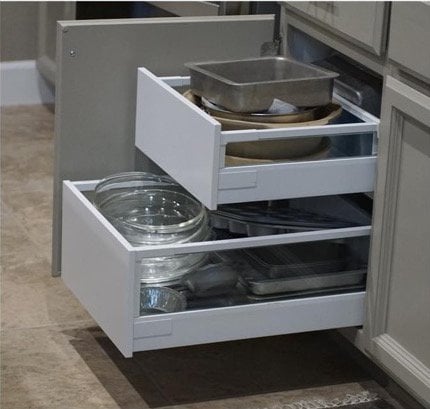
The creation of such a functional space can be accomplished by installing IKEA Maximera drawers as pullout storage. See Photo 1.
If you have nominal 18” wide cabinets that are 24” deep in your kitchen (or anywhere for that matter), you can install IKEA Maximera drawers as pull-outs in the cabinets with no alteration of the existing cabinets or the IKEA drawers. All that is required are some screws and two 16” lengths of 1×2 wood for each drawer.
We have installed 13 Rationell drawers (now replaced by the Maximera low height drawers), one Maximera medium height drawer, and one Maximera deep height drawer as pullouts in our kitchen using the following approach.
Things to Consider:
- Width measurements. In our kitchen the inside width of our nominal 18” face frame cabinets is actually 19”. The cabinet openings, however, measure 17&1/4” wide. IKEA Maximera nominal 18” drawers, on the other hand, are actually 16&1/2” wide. (All actual Maximera drawer widths are 1&1/2” less than their nominal widths. The nominal width is the dimension of the Sektion cabinet they go in.) Consequently we could put 18” Maximera drawers inside our 18” cabinets. To sum up, your cabinet opening must be at least 16&1/2” wide and the width of the inside of the cabinet at least 18” to allow for the width of the drawer and the two pieces of wood.
- Height of shelf space. Maximera drawers come in three depths, low (3&1/8”), medium (5&5/8”) and deep 8&3/8”). You will need to decide what height drawer you want to use based on existing cabinet shelf heights and personal preferences.
- The low height drawers are the easiest to install. The medium and deep drawer installations are also straightforward if you have cabinets with adjustable shelves, but can be slightly more involved if the cabinet has fixed shelves. Installation is still readily doable, there are just a few more steps involved.
- Forvara drawers. While it could be done, I would not use the new Forvara drawers as they do not use the same drawer glide mechanism as the Maximera drawers. The Forvara glides mount high on the sides of the drawer box, which would make it more difficult to mount in the cabinet space.
- Level of difficulty and timing. This is a straightforward and relatively easy project. If you can drive a screw and have a power drill you can do this project. Allow about an hour for each drawer, slightly longer for the first one.
Materials List Per Pullout:
- One Maximera 18” x 24” drawer unit of chosen height.
- Corresponding Utrusta drawer front.
- If you install medium or deep height drawers, consider whether you want the Maximera Add On Sides for the drawers.
- Four 2” drywall/cabinet type self-drilling wood screws.
- Four 5/8” #8 flat head Phillips wood screws.
- Two 16” (approximate) lengths of 1×2 board per drawer installation.
Tools List:
- Saw, to cut the wood.
- Drill, and driver bits to drive the screws.
- Self-centering drill bit. Not absolutely necessary, but helpful.
- “Right Angle” drill or driving attachment to drive screws inside the cabinet.
Assembly:
A) DRAWER GLIDES
1. Cut two pieces of 1×2” board about 16” long.
2. Attach the drawer glides to the pieces of 1×2” wood using the following steps. (Attention to detail in aligning the pieces is important to ensure a smooth operating drawer.)
(a) Perform Step 10 of the IKEA Maximera directions related to the drawer glides.
(b) Place the front end of an assembled glide 5/8” from the end of one of the pieces of wood placed on its 3/4” side. (The set back allows for the width of the drawer front.) Make sure the bottom of the glide is even with the bottom of the piece of wood. (Work on a flat surface and use the other piece of wood as a registration surface to push the two pieces against to make sure they are properly aligned.)
(c) While holding the aligned pieces in place (or clamped in place), attach the glide to the piece of wood using two flat head phillips screws, one in front and one in back. (If you have one, use the self-centering drill bit to drill holes through two of the mounting holes on the glide before driving the screws to ensure better alignment.) See Photo 2, which shows the installed assembly.

3. Do the same for the other glide and board.
Drive two of the 2” screws into, but not through, each of the boards from the top, one about 2” from the end the glide is aligned to (the front), and the other about halfway down the board. (Further back and the second screw becomes hard to reach during installation in the cabinet.) See Photo 3, which shows the installed assembly.

4. Set the two glide/board assemblies (the “glides”) asideDrawer boxLow drawer: Assemble per the IKEA Maximera directions.
B) DRAWER BOX
1. Low drawer: Assemble per the IKEA Maximera directions.
2. Medium and Deep drawers:
(a) In cabinets with an adjustable shelf: Assemble per the IKEA Maximera directions.
(b) In cabinets with a fixed shelf: Assemble per the IKEA Maximera directions through Step 5. The rest of the drawer box assembly will occur later.
C) DRAWER INSTALLATION
The drawer installation instructions are written for a cabinet with a fixed shelf. For cabinets with an adjustable shelf, simply remove the shelf during installation and replace it when the drawer is installed. To install a drawer on an adjustable shelf, follow the installation steps below.
1. Remove all items from the cabinet space where the drawer is to be installed.
2. Turn the drawer box upside down and fit the drawer glides into their tracks on the bottom of the drawer box.
3. For low and medium drawers, put the drawer assembly right side up into the cabinet. You may have to tilt it to make it fit because the width of the assembly may now be wider than the cabinet opening because of the pieces of wood. (For medium drawers you may have to slide the drawer out on the glides a little bit while you put it in to get it to go in the cabinet. This will depend on the space between shelves and how much you can tilt the assembly.)
4. For deep drawers, the height of the drawers may not allow them to be placed in the cabinets the same way as the low and medium depth drawers. If you can get the assembly to fit in your cabinet, great! If not, here is how to get it in:
a) Remove a glide from one side of the drawer assembly and put the remainder of the assembly into the cabinet.
b) Pull the drawer all the way out on the installed glide and tilt the side without a glide up.
c) While holding the assembly in the tilted position, slip the other glide under the drawer box and fit it loosely into its track slot.
d) Push the assembly back into the cabinet on the installed glide and lower it all the way down. Gently pull the drawer in and out all the way until the drawer box catches on the second glide mechanism. You will hear and feel when it catches.

5. The complete assembly is now in the cabinet.
6. For all drawers:
a) Once the assembly is inside the cabinet, center it in the cabinet opening and, holding it by the boards and sides, pull it towards you so the front ends of the wood pieces butt against the insides of the cabinet face frame.
b) Slide the unit in and out a couple times to “settle” it in place.
c) Making sure the pieces of wood are still butted against the face frame, drive the front 2” screws in the pieces of wood into the bottom of the cabinet (or shelf).
d) Check to make sure the drawer moves in and out easily.
e) Drive the back screws into the cabinet bottom or shelf.
7. For low drawers:
CONGRATULATIONS! YOU ARE DONE! ENJOY!!!
8. Continued assembly for medium and deep drawers:
a) Pull the drawer out all the way and lift it off the drawer glides.
b) Return to and follow the IKEA Maximera directions from Step 6 to completion.
c) Place the fully assembled drawer on the drawer glides and push it into the cabinet.
CONGRATULATIONS! YOU ARE DONE! ENJOY!!!
~ Bill