Monday, January 02, 2012
Expedit Rolling Kitchen Island
Materials: EXPEDIT shelving unit, LAGAN countertop, BRANAS baskets
Description: Working with a small footprint kitchen I wanted to build an island that would provide seating, storage and extra counterspace. I saw similiar hacks on this site and was inspired to combine them into one super hack!
First - I assembled the Expedit bookshelf - leaving off the top panel and attaching castors to the bottom panel. Note: it's important to use good quality rubber castors given how much pushing, pulling and shoving this island endures.
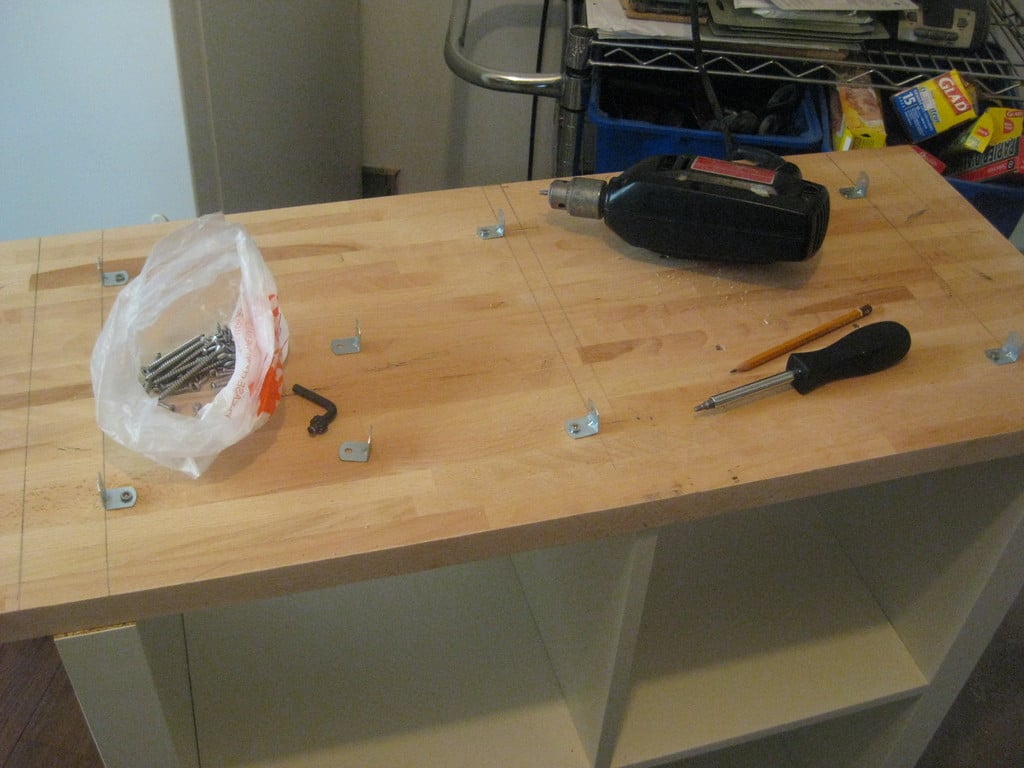
Second - I cut the Lagan countertop to the desired dimensions (just overhanging the front and back of the shelf and giving a more generous 2.5" overhang on either side.) Because the Expedit panels are hollow fiberboard I opted to secure the countertop with multiple small brackets. The easiest way to do this is to lay the countertop over the shelf and draw the lines of the shelf panels on the underside of the countertop. Then flip over the countertop and secure the brackets. Flip it back over and secure the brackets to the side and centre panels.
Third - I cut a backer panel out of 1/8" thk. primed MDF and secured it to the back of the shelf with finishing nails. This keeps the baskets in place and keeps them from getting kicked from people sitting at the island chairs.
Fourth - I cut the Lagan countertop to create an L-shape and secured to the wall (be sure to find the studs!) with large L-brackets.
Fifth - I cut a 6" x 6" opening in the countertop to sit above the upper right basket. The basket is fit with a garbage bin for easy disposal.
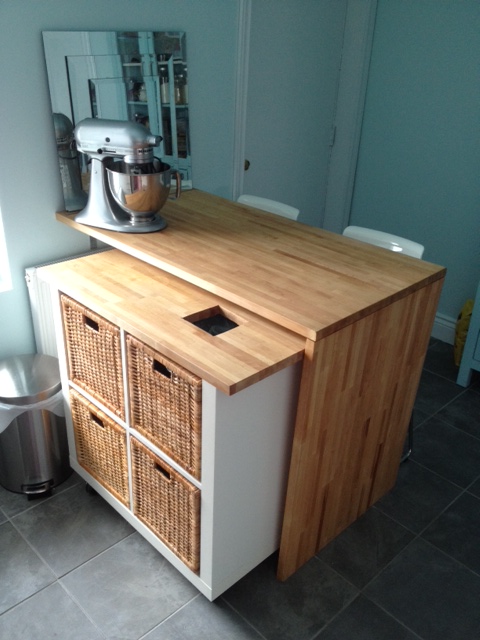
And there you have it - a kitchen island that gives seating, storage and flexibility!
~ Rebecca, Toronto, Ontario
23 comments:
Everyone is free to comment but IKEAHackers.net reserves the right to remove comments that do not contribute constructively to the discussion, contain profanity, personal attacks or seek to promote a personal or unrelated business. SPAM will be deleted.
If you have a Blogger profile, you can click on the SUBSCRIBE BY EMAIL link that will show up below and receive all follow up comments on the hack via email.
Don't have a Blogger profile? Create one for free here so you won't have to be be listed as "anonymous".
Subscribe to:
Post Comments (Atom)


Great! How is the topping? Any paint?
ReplyDeleteWay to go Becky! I love it! I especially like the clean lines, the wood effect, the textured look and the multi purpose end result ... you are an excellent designer and builder. Thank you for sharing this super neat idea!
ReplyDeleteMoonbeam
AS great as ever Becky.
ReplyDeleteHow comes when I do it, it never looks like yours though!
This I like very much.
ReplyDeleteCheap, good looking and with very good function :-)
More of this!
Rebecca,
ReplyDeleteWhat Casters did you use? Any specific Brand?
Great Job!!
this is the best kitchen island hack ever, I'm so looking forward to duplicating this in my new apartment.
ReplyDelete@Tyroni - I don't remember the brand name but they were industrial grade castors I got at Home Depot. Don't go for the small plastic version, get the large rubber kind. And space the castors far apart - the Expedit unit is narrow and can tip if you space the castors close together.
ReplyDelete@Beate - I used only mineral oil to treat the wood countertops. It's food safe and easy to obtain.
Rebecca
Definitely one of my favorite IKEA hacks. Both functional and great looking. Good Job!
ReplyDeleteWhy have you spent so much money on a mixer, but are then really tight with the island you put it on?
ReplyDelete@ anon jan 4: I gather you don't bake. If you did you wouldn't ask.
DeleteOMG!?!
DeleteHow did you attach the L shape counter to the floor?
ReplyDelete@Anonymous - I didn't attach the island to the floor. The top of the island is secured to the wall and end gable with heavy duty L shaped brackets. The brackets maintain the L shape and uses the side gable as a table leg. Also, this means the island is easily removable with little residual damage.
ReplyDeleteRebecca
Fantastic - thank you SO much for this tutorial. I love how functional it is. The inner part can be rolled away so someone can comfortably sit on that side.
ReplyDelete@Anonymous: I'm not entirely sure about the poster's reasons, but those mixers are worth their money. They last a lifetime and are way more powerful than the cheap options out there. For the island, the extra cost generally isn't justifiable or desirable.
ReplyDeleteWhat a great idea! So practical!
ReplyDeleteThis is so. Awesome! I've been wanting a kitchen island for so long, and it has to be non-stationary because of our stupid floor plan. You have given me the answer! Thank you!
ReplyDeleteI love this! My boyfriend and I are very excited to try our hand at it. I just have two questions: which chairs did you use (or how tall do they have to be) and what did you use to get such a perfect cut for the trash disposal hole? We don't have any saws, but our apartment is within walking distance to a Home Depot...I wonder if they could cut it for me if I brought it over?
ReplyDelete@Anonymous, I used the Glenn bar stools from Ikea - the smaller size (seat height is 26") The height of the counter is approx 36". I used a jigsaw to cut the hole in the countertop. I did a plunge cut with the saw and then worked slowly around to create a square. Unless you're an expert (which I'm not) it's a tricky cut. You could try taking the countertop to Home Depot, I know they cut lumber you buy from them but I don't know if they'll cut lumber not bought at the store. However you could rent the jigsaw tool and do it at home.
ReplyDeleteGood luck!!
Rebecca
hi, great work!!! i love it...in the tutorial you have stated that you cut the lagan to make L-shape countertop...may i know the length and height of the L-shape countertop? thank you...
ReplyDeleteHi Hafiz,
DeleteThe height of the L-counter was 36" and the length was 4'-2".
Hope that helps!
Rebecca
Do you think l-brackets would be strong enough to make just the top part of this project and throw another piece of lagan on the other end (rather than wall-mount) ...to make an all-lagan table (possibly on casters)?
ReplyDeleteIt really depends on the length of the top of your table. My island is approximately 4'-2" long. I would maybe go to 5'-0" long but any longer than that and I would look at doing a centre gable for extra support. If you want to do the whole thing on casters I would add a base to the table for extra support.
DeleteDoes that anwer your question?
Rebecca