

Materials: 2x Lack Wall Shelf (191cm), 2x Expedit Shelving Units (2×2) , 1x Expedit Desk, 6x Lack Shelf (26cm)
Description: My wife and I just moved into our new home and decided to convert our upstairs hall area into a study for both of us. She wanted a regular sitting desk, while I was stubbornly adamant to have my own standing desk. I’m 6′ feet tall so I couldn’t use a previously mentioned Expedit standing desk because I wasn’t tall enough for that one.
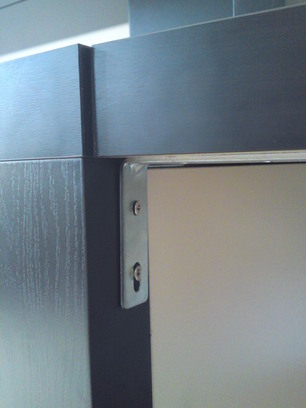
First I started by assembling a 2×2 Expedit Shelving unit as normal. And then with 2 metal brackets I bought from the hardware store screwed an Expedit desk to the top of the shelving unit. (note: the brackets supplied with the desk will only fit a 2×4 or 4×4 Lack shelving unit, to fit a 2×2 unit you’ll need to buy a separate bracket and do-it-yourself).


Next I screwed on a Lack shelf (26cm) onto the top of the Shelving unit. This acts as the base for the Lack shelf (121cm) to become my standing desk.
Finally I assembled a second Expedit shelving unit with a Lack shelf (26cm) base and connected the two via a 121 cm Lack shelf. This acted as the standing desk.
One lack shelf was not sufficient so I repeated steps 2and 3 again for a second 121cm Lack shelf. A single lack shelf doesn’t have enough depth to be a desk.
Then to top of it a of a few accessories for the Expedit Shelving units and a couple of lamps give the shelf a nice feel to it.

See more of the Lack + Expedit standing desk.
~ Keith Rozario, Malaysia