

Materials: Varde workbench, Domsjo sink, scrap pieces of white melamine, scrap pieces of birch veneer, jigsaw, silicone sealant
Description: When it came time to sort out the kitchen for the new house, it seemed there’d be no cause for argument – we both loved the chunky trad/modern good looks of Ikea’s Varde freestanding kitchen.
That said, there was a wee bit of tension brewing over sinks. While I was gushing over the pristine beauty of white porcelain, Phil was lobbying hard for the easy-clean practicality (and fewer wine glass fatalities) of stainless.
Finally though, even Phil had to admit that the Varde stainless steel sink unit was a little – well, ho hum. If only he could fit an elegant Domsjo porcelain sink into one those sturdy Varde workbenches. In the pursuit of domestic bliss, he decided to get hacking.
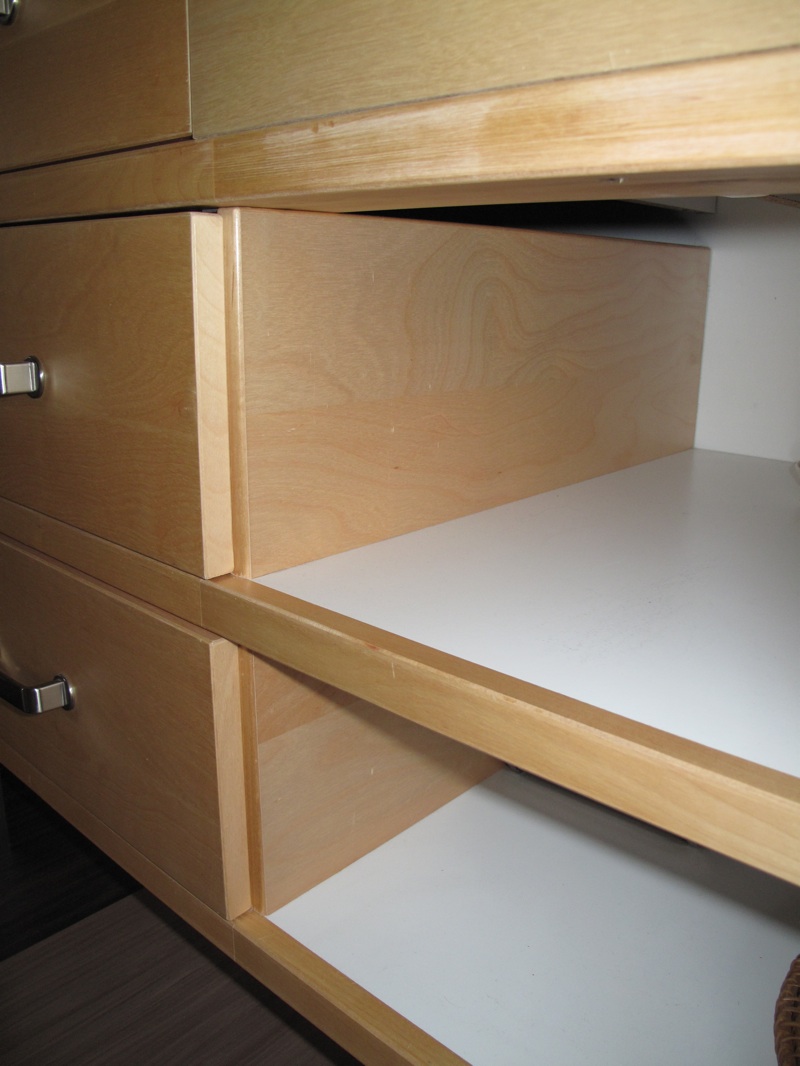
Step 1: Varde bench before – 3 drawers in a horizontal row. First decide on which side you want your sink. Right worked for us. Pull out two drawers and unscrew sliding mechanisms. Remove the centre panel of white melamine dividing the drawer cavity. Also remove the inner right side drawer mounting panel (see birch piece resting on drawers on the floor.) Cut another piece of birch (sourced from Ikea’s bargain basement) to the same size.

Step 2: Reattach these two pieces of birch to the left side of the cabinet – one piece on the second shelf, one piece on the bottom. You’ll also need to cut two more birch panels to frame the right side of the drawers. Screw these panels into place from beneath the shelf. (Phil also braced the panels at the top with a piece of aluminium angle.) Reattach sliding mechanisms. Insert drawers.
Step 3: Time for the sink. Cut two pieces of white melamine and attach as shown. These panels will support the sink on either side. They can be screwed in from underneath the drawer support rail, and dowelled into the back panel for extra strength. The two white metal brackets (resting on the middle shelf) come with the sink and can be used as a handy guide for measuring the spacing between the panels. (These brackets will be attached later to help support the sink.)

Step 4: Measure sink side and back, transfer measurements to bench top and cut out the cavity. Note: The back edge will need to be rebated so that the sink can sit far enough back without leaving a gap. So, after cutting out the cavity, lower the sink into place and mark guidelines for the rebate along the back edge. Remove sink and cut the rebate. (Take care to avoid slicing into the thin back panel of the cabinet.)
Step 5: Photo shows the underneath view of sink and the rebate. As you can see, the vertical rebate sections need to be cut fairly deeply into the chipboard backing. A chisel works fine if you’re careful. Now attach the white metal sink support strips. Note: In the photo the sink is shown elevated above the supports so that you can see the rebate more clearly.

Step 6: Cut a panel from another piece of birch to fill in the space around the front of the sink. (The piece we found It isn’t a perfect match, but should mellow/yellow out with time.) Once the plumbing’s all sorted, set the sink permanently into place with clear silicone.

Voila! Domestic bliss. Now whose turn is it to do the dishes?
See more of Wendy and Phil’s Domsjo sink hack.
~ Wendy Hincks Ward, Sunshine Coast, Australia