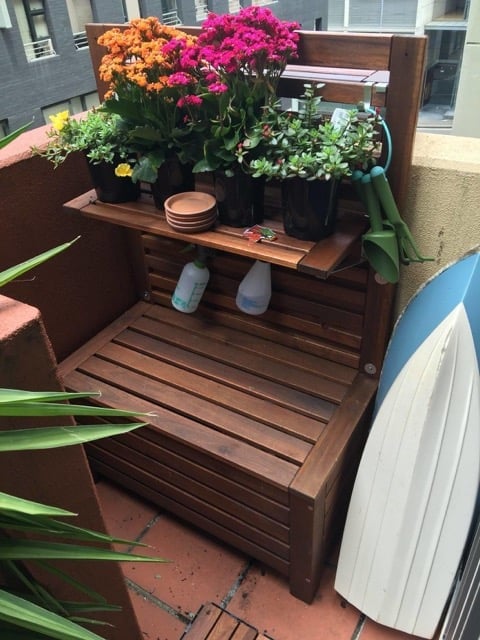
I wanted to utilise a small awkward corner of the balcony for an outdoor storage bench and potting table.
Having always admired the look and functionality of the ÄPPLARÖ wall panel and storage bench combination, I was almost dissuaded when I learned the panel would require fixing to a wall and is not actually fixed to the storage bench itself.
Being in a rented apartment I did not want to drill holes in walls. Besides, it was to be positioned up against the balcony’s outer wall where it is not high enough to fix onto anyway.
What I really needed was a freestanding version. Using this hack will mean the panel will sacrifice about a third of its original intended height — however it was the perfect solution for my particular application (hopefully yours too).
Just before we get started, I want you to take the following into consideration.
First things first
Firstly, I used flat washers when securing all the screws and bolts, namely in a bid to aid with the strength of construction.
While I recommend sticking to the hack as designed, for reasons of your own, e.g. aesthetic purposes or whatever, you might decide not to go down that route.
Personally I don’t think the washers look too out of place, especially if you opt for washers in a finish similar to the hook accessories that are included with the wall panel.
Secondly, I purposely designed this hack to use the storage bench lid to be ‘weight-bearing’ for the upper wall panel, again to aid with stability and rigidity.
Therefore, I would recommend to always put the lid back into it’s ‘closed’ position whenever possible to avoid placing unnecessary stress on the lower panel, especially if you intend on using the optional shelves and putting things on them like I do.
Finally, there are easier (if not simpler) options and alternatives to this hack, such as using some timber to create a frame to bolt the whole lot together as seen in another other similar hack. Or, maybe modify the storage bench lid so the upper wall panel butts up hard against the top edge of the storage bench. Either way, I just happen to like how this one turned out 🙂
With that said, lets get started.
You will need:
- 1 x ÄPPLARÖ wall panel set (comprised of upper + lower wall panels & fixings)
- 1 x ÄPPLARÖ outdoor storage bench
- 6 x round head wood screws (~35mm)
- 2 x round head threaded bolts and accompanying nuts (~45 to 50mm)
- 10 x flat washers (~30mm dia.)
- a drill (with bits to drill pilot and main holes)
- an appropriate screwdriver
- an appropriate spanner / adjustable wrench / shifter etc
ÄPPLARÖ outdoor storage bench with freestanding wall panel – instructions
1. Assemble the ÄPPLARÖ outdoor storage bench, without its lid or floor. Or if you have an existing ÄPPLARÖ outdoor storage bench (like I did) remove the floor and the lid.
Figure 1. Partially assembled storage bench (without lid or floor).
2. Lay the bench on its side lengthwise. Keep in mind that the side now lying on the ground will become the ‘front’ of the storage bench after this project is completed, and the side sticking up into the air will become the ‘back’.
Prepare the lower wall panel
3. Next, prepare the ÄPPLARÖ wall panel. It comes in two main parts – the lower part and upper part, plus the accompanying dowels to connect them together and some accessory hooks. You won’t need the dowels.
Take the lower wall panel part and place it on top of the storage bench, lining up the feet of the panel against the feet of the storage bench to ensure they are all squared up and flush.
Figure 2. Lower wall panel part
Figure 3. Aligning the feet.
4. With the bench and lower wall panel feet aligned, use an appropriate sized drill bit (smaller in diameter for the wood screws you will be using) to drill a pilot hole right through the wall panel foot and partially into the storage bench foot.
Figure 4. Drilling the foot.
5. Take a flat washer and wood screw and fix the lower wall panel and storage bench together. Do not over tighten.
Figure 5. Fixing the foot.
6. Now do the same for the other foot, and then the remaining upper corners of the storage bench. What you should end up with is the bottom half of the lower wall panel secured to the ‘back’ of the storage bench.
Figure 6. Completed lower half.
Prepare the upper wall panel
7. Next, we will be using the lid of the storage bench to create a necessary gap/ slot between the lower and upper halves of the wall panels and the lid itself.
8. Flip the storage bench (and it’s newly connected lower wall panel) onto it’s back.
Figure 8. Storage and panel on its back. Please forgive the lack of contrast between the subject and the floor in this and the following pics.
9. Take the remaining (top) half of the ÄPPLARÖ wall panel and overlay on top of the lower wall panel. Then install the storage bench lid into its correct position. Next butt the top panel up flush against the lid.
Figure 9a. Overlay the top wall panel on top of the lower wall panel.
Figure 9b. Install lid and align top panel flush against it.
Figure 9c. Close-up of top panel flush against the lid.
10. Using the existing pre-drilled hole in the upper wall panel, drill a hole right the way through the back of the lower panel. The hole diameter should be large enough to allow the ~45mm bolt to thread through without obstruction. Do the same for the other side of the wall panel. TIP: when performing this step, make sure you have something underneath to create some clearance – i.e. don’t drill a hole into your floor!
Figure 10. Use the existing pre-drilled hole in the upper wall panel and drill a hole all the way through the lower wall panel.
Attaching the panels to outdoor storage bench
11. Remove the storage bench lid.
12. With flat washers for each side, bolt the the upper and lower wall panel sections together. TIP: when performing this step you might find this easier by flipping the storage bench onto one side.
Figure 12a. Bolt the top panel to the bottom panel (front view).
Figure 12b. Bolt the top panel to the bottom panel (rear view).
13. Reposition onto its back. Then using an appropriate sized bit (smaller in diameter for the wood screws you will be using) drill a pilot hole right through the upper wall panel and partially through to the top corner of the lower wall panel. Hint: sounds a bit confusing so read this instruction twice, and use the pictures as an explanatory guide. Do this for both sides.
Step 13a. Drill a pilot hole in the upper wall panel near the top corner of the lower wall panel. Repeat for the other side.
Step 13b. Use a screw and washer to connect the upper wall panel to the lower panel. Repeat for the other side.
Step 13c. Once done, stand the entire thing into its correct upright position and it should look like this.
Freestanding wall panel done
14. Install (or reinstall) the floor of the storage bench.
Figure 14. Reinstall the storage bench floor.
15. Back to the storage bench lid – if you’ve installed them already – remove two of the plastic guide lugs (one from each end) from the underside of the lid.
Figure 15. Remove the front guide lugs from the lid (while leaving the back ones)
16. With the plastic guide lugs facing closest to the wall panel, insert / slot the lid firmly into place between the upper wall panel and the top lip of the storage bench. When inserted, the lid becomes a weight-bearing member for the upper wall panel. TIP: depending on your workmanship, it might initially be quite a tight fit. It’s wood, if necessary give it a good whack with the palm of your hand (or a rubber mallet).
Figure 16a. The lid’s lugs should be closest to the wall panel side of the bench.
Figure 16b. A close-up of the lid positioned to slot in between the upper wall panel and the top lip of the bench.
Figure 16c. A nice tight fit 🙂 ahhhhhhh…..
Figure 16d. Congratulations – you are finished. Enjoy.
Here is my final result in actual use as an outdoor storage bench and potting table, complete with optional wall panel shelves (available separately).
~ by Franco


