Using the space under your stairs for storage is a clever and convenient solution. However, finding the proper storage unit that fits ideally can be a challenge.
In this post, we’ll share some IKEA hacks and ideas to help you make the most of this underutilized space under the stairs.
From creative shelving solutions to built-in drawers, we’ll show you how to transform that empty area into functional and stylish under stairs storage. Keep reading for some inspiration and practical tips to get it right.
1. Use bookcases under the stairs

Sgantina wanted a wall of bookshelves under the stairs. They loved the minimal and simple look (and affordability) of the IKEA BILLY bookcase, so they adapted five units to the space. Using a circular saw, they cut the BILLY bookcases to fit, starting from left, mounting one unit at a time.
Apart from the circular saw, they used a hammer, ruler, spirit level, wood screw, wood glue, and wood plug to complete the shelves in the IKEA bookshelf. In the end, the “best friend” was white caulk used to fix all imperfections and holes. All units are regular BILLY bookcases except the second one to the left, which was cut to end where the floor step is.


2. Try stepped storage for size


The TROFAST staggered storage unit seems made for the design of a stairway. It fits comfortably under the stairs and can transform unused space into plentiful storage.
If your storage space under the stairs is behind a closed door, use the TROFAST like Maastricht did. She transformed it into a triangle-shaped trolley to fit the odd under-the-stairs storage space. She fastened four caster wheels on the underside and added a sturdy handle to roll it in and out of the closet for easy access from the side. It now offers space for spare bulk products like wine, potatoes, toilet paper, and pasta.

3. Place a bench with storage

@fraeulein.froehlich hacked a storage bench from the IKEA BESTÅ units in a style similar to her stairway. The effect is seamless, and the entire space becomes a beautiful moment.
4. Build a built-in under stairs storage cabinet

Redditor Bobbymig maximized the space under the stairs with a DIY built-in, complete with a reading nook and a space for the dog bed. He used the IKEA PLATSA frames as the starting point and built MDF paneling around them. Click to see the process of the build here.
5. Add drawers to the awkward space


Drawers are a great idea for the odd triangle-shaped storage space under the stairs. IKEA kitchen cabinets allow you to mix different lengths, widths, and heights to get the right combination to fit the sloped space. This IKEA hacker used three different METOD (SEKTION) kitchen cabinet frames, drawers, and doors to turn the inaccessible under-stair area into functional, convenient storage. See the under stairs drawer IKEA hack.
6. Stack it with KALLAX

LEGO must have inspired Liesa in this IKEA KALLAX under stairs storage idea. She took different size KALLAX units and stacked them under the stairs for both open and closed storage. The space remains open, light, and airy. Worked out beautifully.
7. Make a daybed with storage

Jayne made the most out of the nook, changing the narrow space into a daybed reading nook. Her storage of choice was a KALLAX shelving unit to form the base of the seat and shoe storage. She topped it with a bench cushion (readymade cushion here) to complete the daybed.
8. Use modular open shelving

Open shelving systems like the IKEA BOAXEL will fill the space under the stairs nicely and affordably. Select a combination of shelves, rails, and mesh baskets for customized storage, using different lengths of wall uprights to navigate the slope. You can even use a shelf to create an under the stairs homework station like the image below.

9. An IKEA under stairs idea for a kitchen storage or bar

If your stairs are sited next to your kitchen or dining room, don’t let it get in the way. Plan up the space as part of your kitchen and integrate your cabinets and kitchen appliances under the stairs.
10. Make it a space for pets


The space below the stairs is a perfect spot for pets. Slot in a cat litter hack or enclose it as a puppy pen like Jayne did.
Which of these under stairs storage ideas, IKEA hacks, will you use in your home? Let us know in the comments below.
How to hack IKEA KALLAX for storage under the stairs
The understairs storage area in our house was an awkward, cluttered cupboard but had the potential to be a great storage area in the hallway. If only I could repurpose it with some clever IKEA hackery. The EXPEDIT looked ideal for this project. (The IKEA KALLAX can also be used for this understairs storage solution.)
Materials:
- EXPEDIT/ KALLAX shelving unit (149 x 149 cm) shelf unit in high-gloss white
- 3 x EXPEDIT/ KALLAX insert doors, green
- 2 x shelf brackets
- 1 x large L-bracket
- 18 x small L-bracket (narrower than EXPEDIT/ KALLAX shelf-thickness)
- 44mm square section timber
Step 1: Design
I created a 3D model of our staircase and the complete EXPEDIT shelf unit in SolidWorks, then modified both to work out where I should cut down the EXPEDIT and get a feel for how the thing would look when done.
In hindsight, it’s a fairly simple modification, but creating a 3D model was a useful exercise to fully understand how things would work before attacking the EXPEDIT with a saw. It was quickly apparent that it would need substantial reinforcement after removing two of the four outer panels.

Step 2: Cutting down the Expedit base
First, I marked out the cut and scored the laminate surface with a sharp knife – then carefully cut it with a panel saw.
Step 3: Assembling the first row
After fixing the base to the side panel, I added three upright dividers and fixed one door insert to brace the corner. As a precaution, I used wood glue to fix the dowels in place.

Step 4: Add the first shelf
I inserted the dowels a little way through the shelf to locate it precisely against the upright so it could be marked up before removing it to score and then cut to length. I made a minor mistake when fixing the shelf in place – I forgot to cut down the last upright dowels before inserting them, leaving them exposed and requiring cutting down later (much more fiddly). Lesson learned for the next row!

Step 5: Repeat for the next rows until you get to the top
I fixed the door inserts in place using cabinet connector fixings to provide extra rigidity.
Step 6: Add reinforcement shelf brackets
It needs reinforcing because the Expedit will be without two of the four structural outer panels. The missing upright can be partially replaced with a couple of shelf brackets. My design means this will be covered up when under the stairs, so I’m not too worried about how this area looks.

As with many IKEA furniture, the base panel isn’t solid. Instead, it is a honeycomb of cardboard with a thin outer structure. This means there is nothing substantial to fix the shelf brackets into. To remedy this, I cut two lengths of 44mm timber to insert inside the base. 45mm would have been a perfect fit, but 44mm was good enough and readily available.
I carefully cut away the cardboard honeycomb using a sharp knife and a chisel when the blade wouldn’t reach, creating two slots for the wooden battens to slide into. The shelf brackets could then be fixed to the base and upright (being careful to use short screws on the upright thinner walled panel!).
Step 7: Add reinforcement L-brackets wherever possible
I added L-brackets to the back face of the Expedit wherever I could, taking care to drill pilot holes square to the back to avoid screws puncturing the surface.
Step 8: Cut down spare panels to blank off the back of the cabinet
I marked up and cut the left-over small panels to fit in the back of the cabinet – for the triangular areas and those that don’t have a door insert. I then fixed them in place using a few more of the L-brackets.

Step 9: Cut and fit filler piece to upright panel
The upright panel wasn’t quite long enough to fill the void under the stairs, so I carefully cut the end off the other (unused) upright panel. This could then be attached in place, neatly filling the gap.
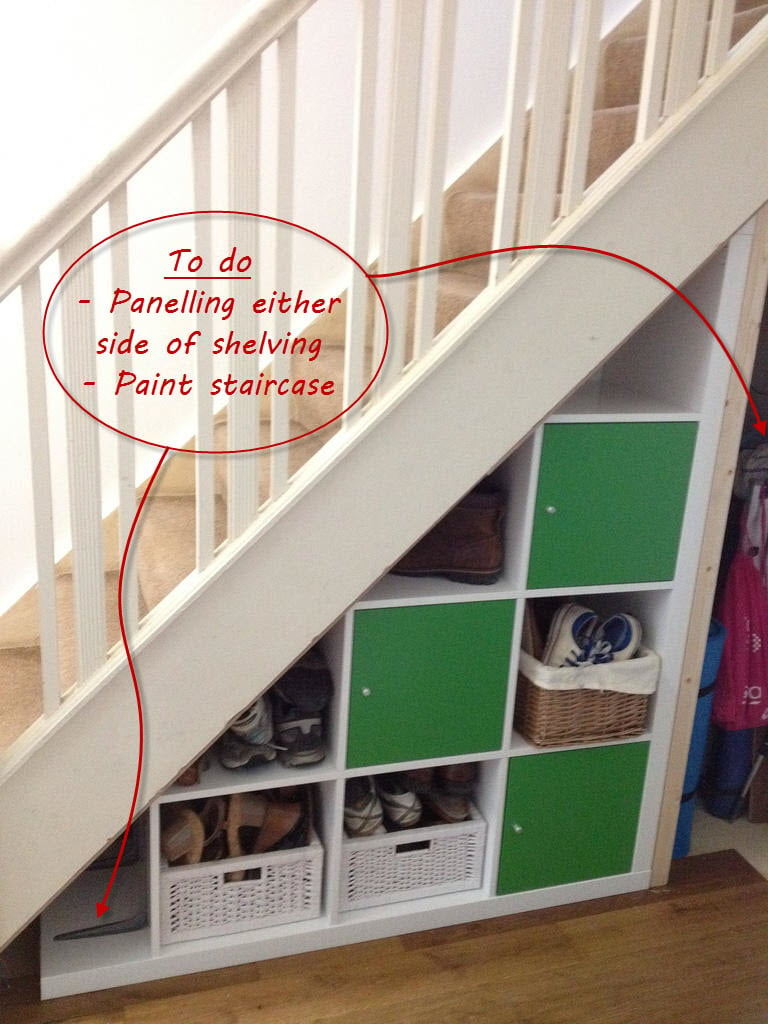
Step 10: The IKEA under stairs storage hack is all done!
It is positioned under the stairs but not fixed in place, in case we need access to the cabling in the void behind it. Two jobs remain: paneling the areas to the left and right of the Expedit and then painting the staircase, but that can wait another day…
See more of the under stairs IKEA EXPEDIT storage hack on my blog.
~ by Nick, United Kingdom