
Two ways to hack a cat box bench but for very different purposes. One as a cozy cat sanctuary and another to hide the cat litter box. Either way, there’s an IKEA hack that’s right for your cat.
Cat Housing Bench with IKEA outdoor storage box hack

I used the IKEA NÄMMARÖ Storage Boxes to make two cat housing boxes to be placed outdoors. The cat box also doubles up as a bench seat. We set up these cat boxes as a refuge for the 4 cats in the colony I have in my backyard. It’s not a litter box but a place for them to sleep, to get away from the cold. They all live outdoors. (They are not domesticated) but are spayed and taken care of.
If you have the older ÄPPLARÖ storage box, you can use that too. The NÄMMARÖ range replaces the ÄPPLARÖ and looks similar. It’s made of durable acacia hardwood and is pre-treated to be better protected against moisture and stains.
Here’s a before-after. Other than the cut out on one side it really isn’t obvious that it’s a cat house.

IKEA items used:
- Two units of the IKEA NÄMMARÖ Storage Box
Other materials and tools:
- Sheets of Plywood
- Bondex
- Saw
- Staple Gun
- Outdoor cat/dog pillows
How to build a cat housing box bench
Step 1: Measure the inside of the bench


I started by measuring the inside of the storage boxes and then bought the necessary plywood to line the interior.
Step 2: Cut plywood to line the inside of the bench
Next, I cut the plywood to size and painted the pieces with dark Bondex so it would not be seen from the outside, the gaps between the NÄMMARÖ slats.
Step 3: Fix plywood to the inside of the bench with a staple gun


Then, using a staple gun I fixed the plywood to the storage box, making sure there were no gaps for air to make a draft.
Step 4: Cut an opening on one side of the bench for the cat to enter
On one of the sides of each box, I cut an opening for the cats to enter, making sure that there were no sharp edges that may hurt the cats.
Step 5: Line the interior
Lastly, I finished it by lining the interior with some cat/dog pillows.
~ by Ildebrando Aires (Sintra, Portugal)

Easy to Clean IKEA STUVA / SMÅSTAD Cat Litter Box Bench

Building a cat litter box bench can be a great way to hide your cat’s litter box while also providing a functional piece of furniture. Using IKEA furniture is a good starting point as you’ll save time constructing a bench from scratch. IKEA has a few benches that are particularly popular for the cat litter box bench hack.
You’ll also need some raw materials like plywood, and cat accessories like a litter pan and litter mat to complete your DIY litter box bench.

Plan for the Cat Litter Box Bench
I’ve been perusing IKEA Hackers for a good way to disguise my cat litter box but nothing quite fit what I wanted. I was wandering through IKEA and noticed the STUVA bench/cabinet. So starting with the STUVA bench and my existing semi-homemade litter box I got going.
The picture above is the end result of my IKEA cat litter box bench hack. Discrete and it works perfectly well. Cats seem to love it too.
Here’s what I used:
- IKEA STUVA Bench (it’s now named SMÅSTAD)
- OPLEV door mat
- Litter box
- Pet door (Optional)
- Motion-activated light (Optional)
- Activate charcoal deodorizer (Optional)
Cat litter box bench DIY
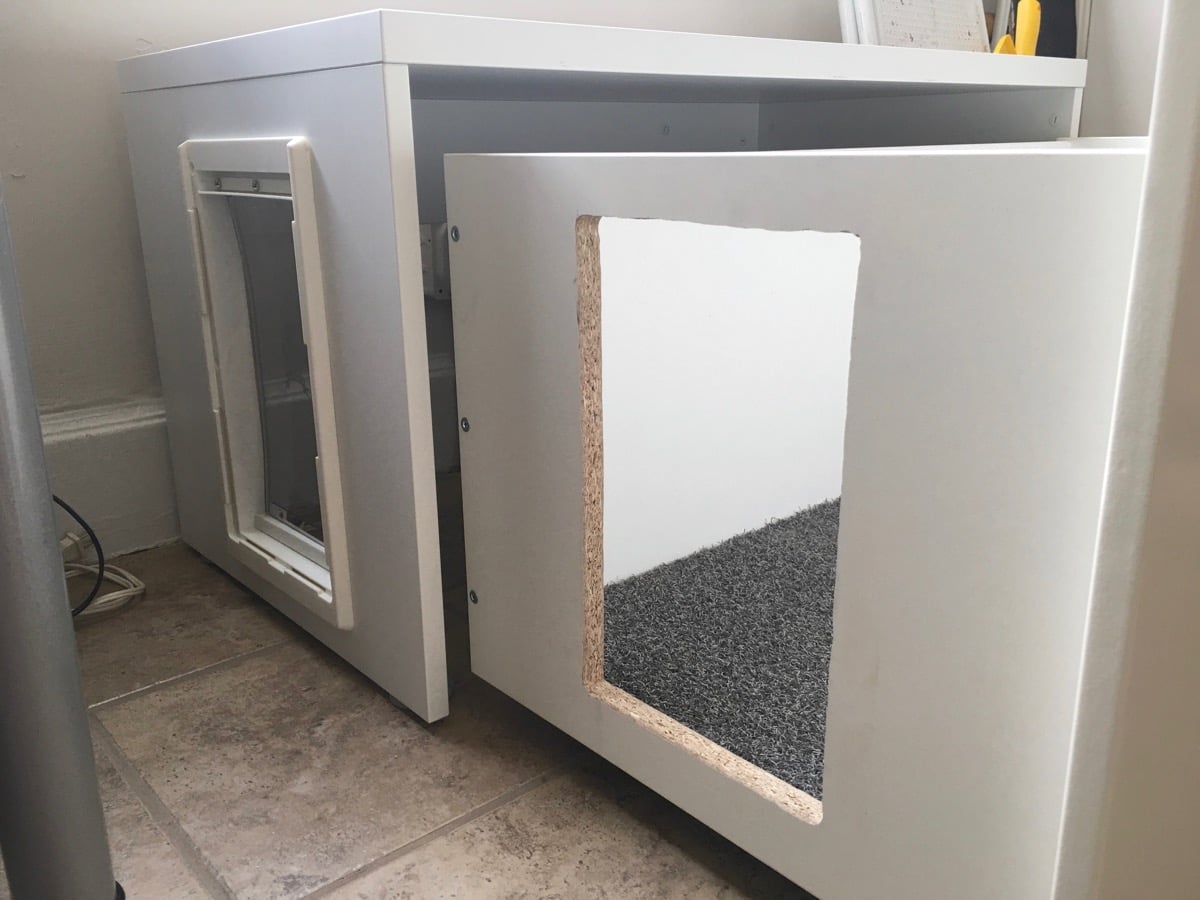
I traced the cat door on the side of the bench I wanted the cats to enter and used a dremel (a jigsaw would be much better) to cut the hole. The cat door was snug enough that it held itself in place. Then I traced the opening on the drawer part of the STUVA bench.
You could definitely clean off the edge of the cuts but I opted to leave it since it’s not seen unless I’m cleaning the litter box and raw wood is the least gross thing you’ll see then. Edge banding would be a good choice if you want to seal up the raw edges.

The OPLEV doormat fits almost perfectly in the bottom. I had to trim a little off. There’s enough room in the bench that the cats have a couple of steps to clean the litter off their feet and the mat catches it. The litter box is a plastic storage box I picked up at Home Depot. (Edit: The storage box is 68 Liters. It’s about 23″ x 16″ x 14″. It’s a fairly large box and I trimmed the top so it would fit under the bench part of the STUVA.) I used the Dremel to cut a hole for the entrance. The high walls keep things tidy and they’re a lot cheaper than store-bought litter boxes.

Not pictured is the motion-activated light that’s stuck to the inside top of the bench and the activated charcoal deodorizer. The drawer makes it easy to clean and then tuck out of the way.
Hack Update:
I picked up a STUVA/FOLJA combo ($10 cheaper than the STUVA/FRITIDS) and the OPLEX mat to do a copycat project. The FRITIDS box that is on casters has different (closed) handles now, so I opted for the FOLJA box. I might cut in some round ventilation holes where the screw holes for the FOLJA box pulls are since we can’t get the FRITIDS box pictured with the open handle at the top of the box front.
I do have an old cat door, but I thought the flap might deter our younger cat from using it and make our older cat feel trapped if the “kitten” snoops in, so I decided to put access holes on both sides for an escape route.
Also, I plan on finishing the exposed particle board with something and probably caulking all interior seams before papering with Contact Paper on the interior for ease of cleaning and to protect the raw particle board inside the seams. I had looked for oval picture frames to finish the outside of the access holes but then ended up grabbing two letter “O” wall decor plaques at the Hobby Lobby to dress it up and cover the raw edges. Got a 56qt clear Sterilite tote for about 6 bucks since I thought it might let a little light in.)
~ by Jordan