
The IKEA BESTÅ TV units are among the best choice when it comes to media furniture from IKEA. They are not as cheap as a standalone TV units but the BESTÅ offers greater flexibility in space planning. You can mix and match BESTÅ frames to fit your space and storage needs.
But don’t stop there, elevate your media center set-up with clever IKEA BESTÅ TV unit ideas and hacks to further optimise function and storage.
Get inspired by our practical IKEA BESTÅ TV unit ideas and take your TV unit to the next level.
1. Built-in IKEA BESTÅ TV unit with open wall shelving
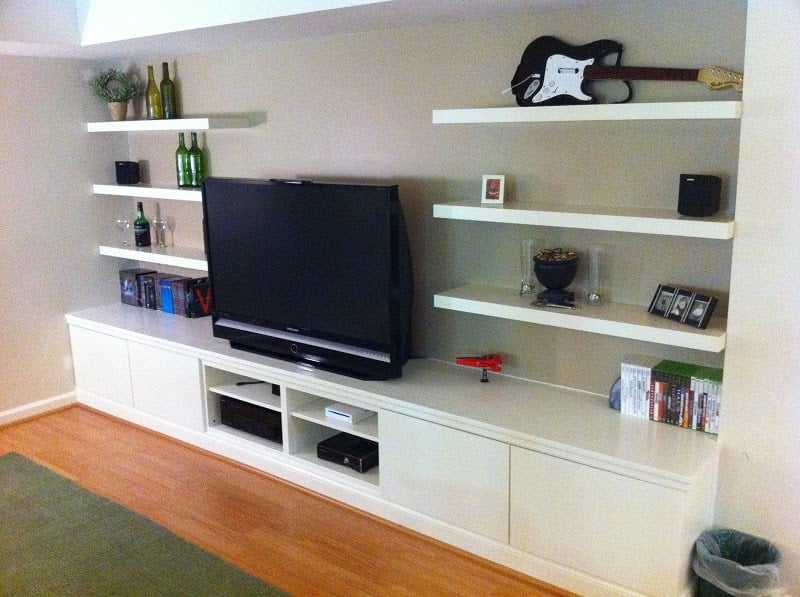
We wanted to have a built-in entertainment center for our basement home theater, it was currently sitting on some wire shelves. So we came up with a plan using IKEA furniture for this project plus a bunch of lumber and paint.
Materials:
3 BESTÅ shelf units
4 BESTÅ VARA drawer fronts
6 LACK wall shelves
We started by building a solid wood base out of 2×4’s to set the BESTÅ shelf units on. This was sized to fit the convenient setback in the wall in the basement.

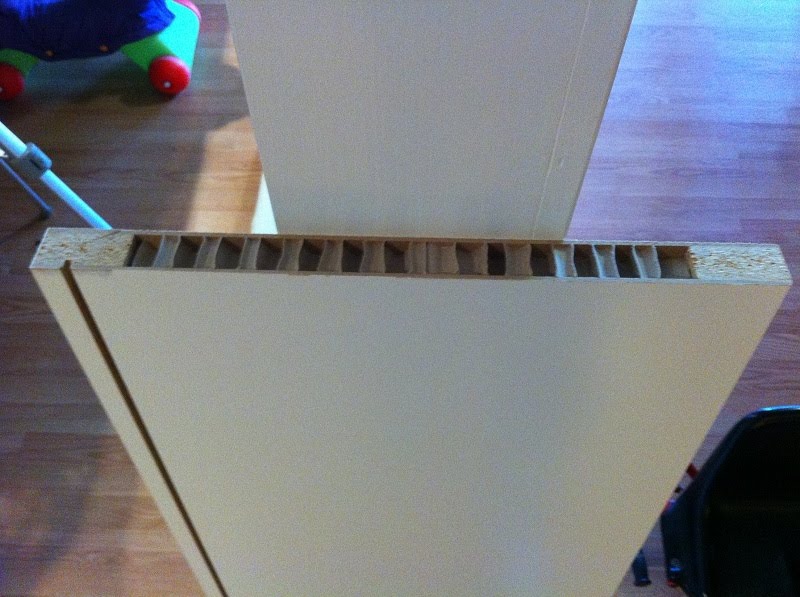
Next we had to size the three IKEA shelf units were about 1.5 inches to0 long in total, so we happily voided any warranties and I modified the unit that would go in the middle. The panels are particleboard with IKEA’s famous honeycomb structure paper filling. So after cutting through it (recommended to use a circular saw), we saw what the BESTÅ was really made of.
After the modification were done, the bases of the cabinet units were screwed down to the 2×4 frame and then they were fully assembled. All the wiring was run for audio, networking, and power hiding it in a gap behind the shelf units and in the walls.

We painted the back wall an accent color. The doors were installed on the unmodified units and we built a custom top panel to go over the BESTÅ TV bench to get the television the correct height. We left off the knobs and used push openers for a cleaner finish.
We also filled in the wall using the LACK open shelves. Oh and we played some RockBand to test all the wiring connections.

We finished by installing the trim and gave the new countertop a few coats of protective paint in white to match the BESTÅ cabinets.
~ by Jason Whittenburg, Atlanta, GA
2. Modify the doors for remotes
Moved into a studio in NYC and wanted the media center in my living room to be clean with no wires. I also needed it to fit a larger 60 inch TV and provide extra storage. I liked the BESTÅ range and quickly designed a TV wall set up on the IKEA website planning tools. The initial sketch is this pictured below.

First I bought the BESTÅ VASSBO Doors with middle square indents. Looking back I could have saved on each door and got the VARA, but I thought the guideline to cut out the center to make the speaker fabric doors would be helpful.
DIY speaker door fronts
1. Cut out the center of the door
I bought a jigsaw to cut out the inserts on 6 of the doors to give the my electronics room to breathe and also for remotes to work through.
2. Staple on the speaker fabric
To finish the job, I bought a Powershot staple gun from Home Depot, but you can also get it from Amazon along with it got a box of T50 3/8″ staples.
Then, I bought speaker fabric from Amazon. (I bought 3 rolls and used 2).
Cut approximate size of speaker cloth to cover all edges. Take staples gun and start with corners and fill in the rest. You can also use glue to keep the edges down in between staples. Just make sure it’s a snug fit but don’t pull to stretch as it might tear.

3. Install the doors as usual
Install the doors with the hinges that came with the IKEA product. Here’s what it looks like on the BESTÅ unit. Works perfectly like a regular door.

Ventilation for the media center
I also chose to leave out the thin fiberboard back panel from the BESTÅ unit to give more room to ventilate and also provide plenty of room for cables.
Since I have a large media server that fit perfectly into the BESTÅ shelf unit, I cut one large hole on side facing windows. This allows access to the rear panel and server fans. I covered it partially with our Mohu Leaf OTA Antenna.
I needed airflow coming into the server so I bought 2x Cooler Guys USB 120mm fans with mounting brackets. Also, I wanted to keep dust out so instead of a grill protector from the kit I bought a set of cheap filters on eBay. Then I aligned the fans to be exactly where the 2 large fans on server case are. Cut out the holes and mount the fans. Now I have excellent airflow through the case.

Next issue was the subwoofer. I wanted to keep it hidden so I tried hiding it inside the BESTÅ cabinet. It wasn’t quite tall enough, but wife was okay with the look as its mostly covered. I cut out a large hole at the back of the cabinet to allow the subwoofer to fit through as it was also too long. This made the BESTÅ frame wobbly. To fix I used one nail to fasten door to both sides and hid them under speaker fabric. And it works fine now.
Finished BESTÅ home theatre hack
I like the look of white cabinets with the black doors. We went with high gloss black doors because I think it looks nicer but you could save money and get plain black/brown.

For speakers I sold my surround setup and got lucky on eBay with finding Definitive Technology SSA-50 for $200. It does a decent job in a small apartment, but not even close to quality of old 5.1 Polk setup. It looks nice and fits in the media center. Wife added IKEA FILLSTA table lamp for extra lighting.
For cable management I purchased cable ties, sticky mounts for cable ties, and TV wire cover. To mount the TV one could go with a simple mount or one that moves and swivels. I have used both types in past. This time I went with swivel version to be able to slightly move tv towards our couch since they were offset. It’s also MUCH MUCH easier to plug cords in.
~ by DIYDaddy
3. Fit the IKEA BESTÅ units into a living room nook
We had a built-in nook for the TV which wasn’t really working for us. It had open glass shelves and very little by way of closed storage. It was in dire need of a makeover.
Our plan was to build an entertainment center within the space with IKEA BESTÅ components, matched with IKEA AKURUM sliding door kitchen cabinets. It turned out well and works every better.
We wanted more storage with drawers and cabinets for toy storage as well. With our IKEA hack, I think we achieved all that.
Here’s the before and after.


Here’s What I Used:
2 BESTÅ Frames
8 drawers (INREDA drawers, BESTÅ drawer fronts)
8 drawer pulls (STRECKET Handles)
4 AKURUM doors
2 INTEGRAL sliding door rails
Wood from Home Depot**
Accessories–mirrors, candles, globes, baskets (IKEA BYHOLMA)

Here’s what I did to hack a built-in IKEA BESTÅ entertainment center
I measured all the built-in spaces first so that I knew the correct measurements and which IKEA frames would work.

I took a BESTÅ drawer front to Home Depot and tried to match the color for the wall paint
Tape off surrounding area, spackle, sand and paint the built-in area.
Assemble and install the BESTÅ frames and drawers.

For the INTEGRAL rail and AKURUM door slides, I had to do some math and figure out what kind of wood I would need in order to get the rail to attach to the wall (because they are meant to work with the IKEA kitchen cabinets).
Once I got the wood, I cut it to size, pre-drilled some holes and attached it to the wall. After that, I could then install the railing system without any issues. The bottom doors on the built in are still AKURUM doors, but I had to turn them sideways and mark new railing placements on them so that they would work for that opening.
(Ed note: IKEA no longer offers sliding door cabinets for their kitchen range. The hack should still work with regular hinge doors. Or if you really want sliding doors, you can hack the BESTÅ to support a pair of sliding doors.)
~ by Loi, Orlando, FL
4. Hack the BESTÅ into a media wall unit

Materials:
BESTÅ TV unit with glass doors
BESTÅ doors (white)
This hack was in response to the undesirable look of the BESTÅ TV cabinets. (See the two frames behind glass doors)

First, I built a frame out of 1×4 pine and painted it to match the brown BESTÅ units. I placed the frame on top of the TV unit and secured it to the TV stand as well as the wall behind. Then I mounted BESTÅ doors as cover panels on top of the frame. The doors are installed using regular BESTÅ door hinges and can be opened up to access the cables inside, behind the TV.
Even though my current TV would have fit in the normal BESTÅ cabinet (40″ Samsung), I like the look of this a whole lot more. If I had wanted a larger TV, I could have done 3 doors as panels instead.
My TV unit now matches the rest of the BESTÅ units for a polished finish.
~ by Derek, St Louis, MO
5. BESTÅ TV unit to elevate and conceal
I wanted a media console that could fit and hide all my equipment but still let signals and sound through, and I found several IKEA BESTÅ hacks on this site which inspired me.
I knew that I wanted to fit 2 front speakers, 1 center speaker, an amplifier/AV-receiver, PS3 game console, assorted chargers, cables and several external hard drives into the unit, and the BESTÅ unit simply couldn’t fit all of this. But if I elevated the cabinet from the floor it would work. So this idea propelled me to hack the BESTÅ TV unit into a concealed entertainment center.
IKEA items used:
BESTÅ TV unit 180x40x32cm (70 7/8×15 3/4×12 5/8″)
CAPITA legs
INREDA flip down hinge
Other materials:
Speaker fabric
MDF-board
Magnetic lock
Assorted screws
Spray adhesive
Staple gun
Spray paint
Angle brackets
How to raise the BESTÅ TV unit
I started with assembling the BESTÅ unit, but not the adjustable feet the came in the package.
In order to fit the amplifier and center speaker into the same unit, I had to buy new legs to fit the 16 cm (6.3″) tall amplifier underneath the shelves.
I got 8 CAPITA legs from IKEA which is 17 cm (6.7″) tall, and screwed them into the cabinet frame. This raised it 17 cm (6.69″) off the floor, and made the amplifier fit underneath perfectly.

To cover up the sides and create something to attach the front plate to, I took one of the shelves that came with the TV unit and cut it in 2 pieces at 17 cm (6.7″). And then I attached them on both ends of the unit with angle brackets. I also cut a third piece which I attached next to the second leg from the left, to make it more stable.
As you can see, the bottom plate at the side is a little shorter than the back of the TV bench itself, but it didn’t really bother me. The gap serves as cord outlets.

How to create a cabinet front
I created the front plate out of a standard 16 mm MDF board which came as a 200×50 cm (79″x20″) board . Then, I cut it to the right width, and cut out holes at both sides in the plate which allowed sound to pass through and a big hole in the middle which allows sound and IR signals at the bottom for the receiver to work.
I left 6 cm (2.4″) around the edges and between the holes to keep the structure of the board solid. Just in case, I spray painted the board black should the speaker fabric would be too transparent. I then wrapped the front of the board in speaker fabric with spray adhesive and a staple gun.
To mount the board to the cabinet, I used two INREDA flip down fixtures. I attached them to the plates I’d attached on the side. After I was satisfied with the alignment, I fitted another speaker fabric on the inside of the board to make it look nicer when it’s open, and prohibit light from the screen on the receiver to pass trough. First, I stretched and fixed the fabric, and then cut it to the right size afterwards. The remote still works perfectly through the board.
To make sure the plate would close properly I also screwed in a magnetic lock on the left side.

The cabinet was originally 32 cm (12.6″) tall, and with the new legs at 17 cm, it ended up being 49 cm (19.3″) tall. The MDF board was 50 cm (19.7″) when I bought it, so I decided to just keep it like that. I also cut the shelf on the right side to fit a speaker, and spray painted over where I cut.
I’m really satisfied with how it turned out, being my first IKEA hack, and it’s a cheap and easy media storage unit if you want to hide all your electronic devices.


Total amount spent: 250 $
Hours spent: 10
~ by Sebastian, Bergen, Norway
Which IKEA BESTÅ TV unit ideas do you like most? Let us know in the comments below. If you have IKEA BESTÅ hacks of your own, share it with us.