Sunday, May 27, 2012
2x2 + 2x4 + 4x4 = My re-structured Expedit
Materials: 3 Expedits (a 2x2, a 2x4 and a 4x4), wood drill with stopper, some extra 6mm-dowels, Japanese saw, wood glue, 4 metal brackets, 2 perforated metal plates, 2 clamps
Description: I always liked the "thick-outer-thin-inner-shelves"-structure of the Expedit but wasn't too fond of the regularity of it ... and neither the fact that everybody immediately recognized the Expedit as such.
I found inspring hacks here like the "Expedit reshuffled" and the "Expedit to the ceiling" and I thought, I'd like some combination plus some modifications the best. So I bought 3 Expedit shelves, a 2x4, a 4x4 and a small 2x2.
I used the smallest just to get 4 extra case boards: 2 as delivered and 2 extra by sawing up the long middle case board into another 2, using a Japanese saw and two clamps. I used one of the delivered case boards to guide the saw a bit and get smooth edges and the same length of my cut pieces.
Then I assembled the 2x4 Expedit quite as intended, just adding a horizontal extra case board by drilling some extra holes and using some shortened dowels.
The 4x4 was assembled, also adding some extra horizontal case boards and shifting some of the vertical ones into different positions to loosen up the oh too cubical structure. The bottom panel was left away in order to have just one thick middle case board.
I attached small white brackets where I thought that the "outwards directed" forces on the shelves could be higher than intended and tolerated by the original Expedit, but I don't think this is truly necessary.
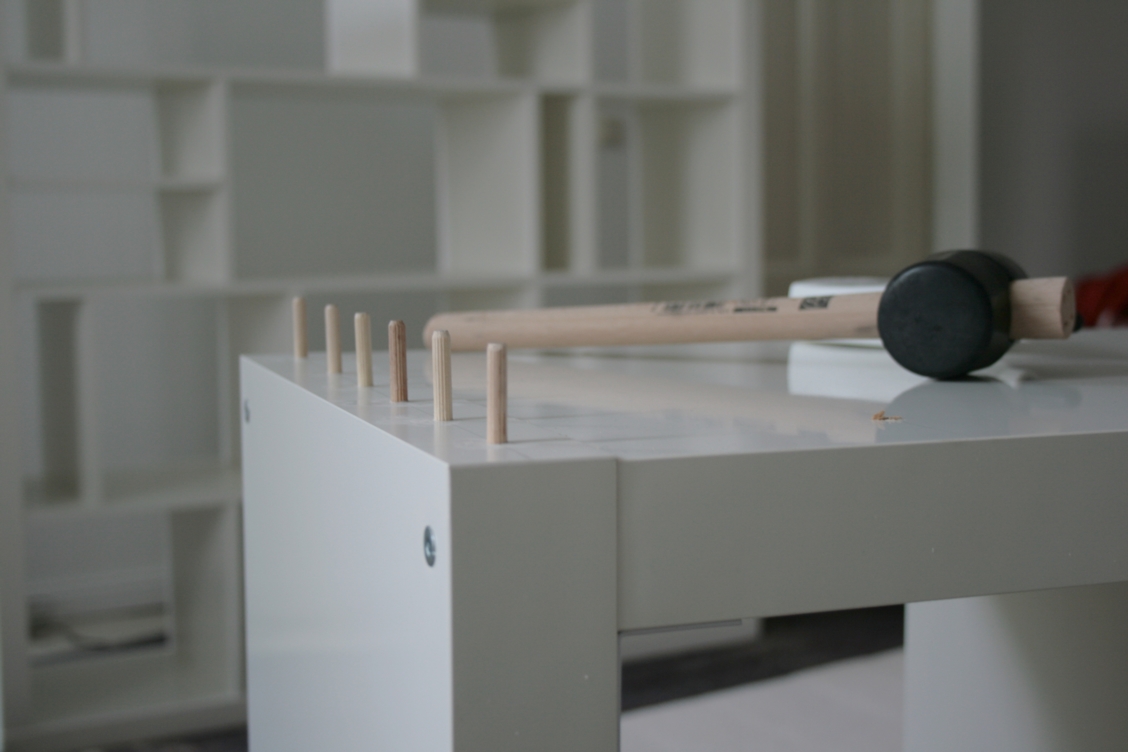
For the drilling I used a wood drill equipped with a little stopper to avoid accidental holes running through rather than just into the board.
The thin inner shelves are pretty massive but do take care when drilling into the thick but mainly hollow outer pieces. Those only contain massive parts where the screws and dowels belong in the original design.
Then I used 12 of the extra dowels from the 2x2 to fix the "bottomless" 4x4 on top of the 2x4. Since the massive parts of outer boards are only about 1cm thick (and then hollow again) the dowels needed to be glued into one piece and allowed to harden there. (Else they would have be pushed into the hollow gap instead of sliding into their "counter-holes".)
Since I'm a petite woman working alone, putting the pieces together worked best with both shelves lying on the ground and inching them closer and closer with 2 clamps. When the shelves were positioned properly, I fixed them with 2 perforated metal plates...just in case the dowels break or whatever.
Afterwards I "simply" lifted the whole thing from the ground (2,20m high and about 100kg ... get help from a friend as I should have done! ;) ) and pushed it into its space, assembling and adding four Expedit-doors into the whole thing.
One last note, the Expedit pieces are laminated and thus sensitive to sharp edges or anything else which could scratch them. I'm lucky since I built on a soft carpet and hence could push and shove the whole thing into whatever position. Else I highly recommend a large blanket or similar!
~ Katrin, Berlin, Germany
24 comments:
Everyone is free to comment but IKEAHackers.net reserves the right to remove comments that do not contribute constructively to the discussion, contain profanity, personal attacks or seek to promote a personal or unrelated business. SPAM will be deleted.
If you have a Blogger profile, you can click on the SUBSCRIBE BY EMAIL link that will show up below and receive all follow up comments on the hack via email.
Don't have a Blogger profile? Create one for free here so you won't have to be be listed as "anonymous".
Subscribe to:
Post Comments (Atom)


Fantastic! I love the look!
ReplyDeleteWow, this turned out great!
ReplyDeletethis is wonderful -- wish I'd seen it before getting a custom bookcase built!
ReplyDeleteWONDERFUL!!! If Ikea designers ever look at this site, they totally need to copy this and sell an expedit like this in the stores. I know I'd buy it!
ReplyDeleteBeautiful! One of the best hacks I have seen. Congrats!
ReplyDeletethere's a whole new thread for us -- techniques for single people, smaller people, etc -- Katrin, thanks for the tip on the clamps!
ReplyDeleteI agree totaly with strike first- so well done!
ReplyDeleteNeomi
Great hack! looks right from an art gallery!
ReplyDeleteThanks all for your lovely comments.
ReplyDeleteIf you wanna see more pictures or ask questions:
https://www.facebook.com/media/set/?set=a.10150462807560528.357724.566070527&type=3
Kat
Looks great - but how did you fill in the original unsed holes in the horizontal boards?
DeleteI'm doing something similar on a high-gloss white expedit.
Thanks!
Guido
Wow! I vote this for Hack of the Year - absolutely spectacular!
ReplyDeleteExcellent! That's a quite unique expedit. :)
ReplyDeleteBeautiful work Katrin...I love the look :-)
ReplyDeleteHallo Katrin :)
ReplyDeleteSuper schöne Arbeit. Was hast du mit den vorgebohrten Löchern gemacht, die ja jetzt sichtbar werden, wenn du nicht die vorgegebene quadratische Fachreihenfolge einhälst. Oder hast du sie einfach so gelassen?
Wirklich toll gemacht.
Liebe Grüße von (auch) Katrin
Hallo (auch)-Katrin :)
ReplyDeleteich habe die Löcher offen gelassen bzw. dort wo der durchgehende Dübel rausguckt, diesen einfach mit einer flexiblen Japansäge abgesägt - am besten Malertape rund um den Dübel kleben, damit keine Kratzer auf der Laminierung entstehen.
Ich hatte erst vor die offenen Löcher mit weißem Holzspachtel zuzumachen, aber dann sah ich wie unauffällig die sind und hab mir die Sauerei erspart. Die Leute sind solche Löcher eh von Regalen mit variablen Böden gewohnt und wenn erstmal Bücher drinstehen, ist die Hälfte davon nicht mal mehr sichtbar. Der Auwand lohnt also kaum, sie zu verspachteln.
Manchmal gibts ja auch so weiße Kreise auf Klebefolien, die mit Schränken geliefert werden, um Schraubenlöcher zu tarnen (oder man schnippelt selbst). Die könnte man vielleicht nutzen, wenn die Löcher doch stören.
LG
Ah super, vielen Dank.
ReplyDeleteJa im Prinzip stören die Löcher echt wenig. Hab mich auch erst geärgert, weil ich meins nicht an der Wand befestige, dass dort Löcher zu sehen sind - aber wenn erstmal was drinsteht fällt es wahrscheinlich genauso wenig auf wie bei mir.
Nochmal großes Lob :)
LG
Kat
Hi Kat! Thanks for posting this i am so in love with it! I would like to access the facebook link but it says its either removed or i do not have permission to view it. is there anyway to bypass this so that i can view more pictures? Thank you!
ReplyDeleteHey, the problem may have been that the photoalbum-setting was "friends only". Sorry! Try again and if it doesn't work, send an email to die_apothekerin@arcor.de.
ReplyDeleteBest, Kat
https://www.facebook.com/media/set/?set=a.10150462807560528.357724.566070527&type=3
ReplyDeleteIt works now! Thanks Kat :) you are an inspiration!
ReplyDeleteAmazing!!
ReplyDeletegreat Katrin thank you very much for the idea :)))
ReplyDeletehttps://www.facebook.com/media/set/?set=pcb.10151429436134186&type=1
Great !!! Magnifique !! Thx
ReplyDeleteJust fantastic post, the Expedit shelves have a lot of options of combination, and adapts to all the spaces of our place.
ReplyDeleteThank you